 Sharpening speed skates is both an art and a science. You will see many different styles as you travel around the speed skating world. All speed skaters should eventually learn how to sharpen their own speed skates. The Club generally runs one or more sharpening clinics in the fall, which provides a convenient way to learn the basics. Another way to learn is to sit down with a coach or older skater who knows how to sharpen skates. For newer sharpeners, the Club has jigs that can be borrowed to sharpen skates. Skaters in the competitive program will also sharpen skates for a small fee (usually $8 a pair). It really makes a difference to have sharp skates, so please remember to sharpen regularly. Once skates get very dull, they are more difficult and time consuming to sharpen.
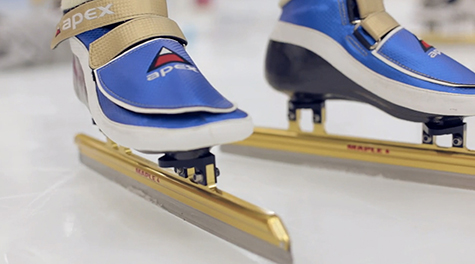
Speed skate blades are flat ground as opposed to the hollow ground of hockey and figure skate blades. A flat ground blade reduces the friction on the ice and is a major reason why the speed skate will glide further than the hockey skate for a given amount of force. A speed skate cannot be sharpened effectively on a hockey skate sharpening stand and a hockey sharpening apparatus will effectively destroy the blade. The skates must be sharpened simultaneously in order to assure that the blades are mirror images of one another, both in the rocker and in the amount of blade on each skate. Sharpening each skate individually as done by a hockey stand cannot guarantee that the blades have the same rocker or amount of steel. The objective of sharpening speed skates is to sharpen them perfectly flat, with a 90 degree angle on each side. During the sharpening procedure, it is important not to change the rocker on the skates or to damage the bend.
Difficulty in sharpening is directly proportional to the length of the time between sharpening and the care that the skate blade gets. If you cannot shave any fingernail on the edge of your skate, it is too dull to skate on and should be sharpened. The duller a skate gets, the more grinding must be done to produce a burr and the greater the chance of changing the position of the high point of the rocker.
A detailed description of sharpening is given below. It is followed by a list of important points in short form to help you remember the important points in sharpening speed skates. Only parents and/or skaters who have taken the Club’s sharpening clinic or who have been shown the complete sharpening process by a knowledgeable person may borrow the Club jigs or sharpen club skates. Borrowers of club jigs and sharpening stones are expected to have their own oil (baby oil without aloe vera or any other additives) and burr stone.
The following description covers the basic methods of sharpening skates. There are many variations on the basic method and many different opinions on the fine points of skate sharpening. However, if you follow this description, you will do a good job and have sharp skates.
Equipment Needed
-
Skate sharpening jig
A variety of different jigs, all following the same basic design, are available. If you are interested in purchasing a jig, the same type as the Club jigs are a good choice. There are several different manufacturers. Avoid any type that requires you to take the blades off the boots to sharpen them. You should get a tool box to carry all your supplies. -
Sharpening stone
A large grinding stone is required to sharpen skates. The stone must be kept in good shape. That is, it must be flat and clean. If you follow the directions below, the stone will remain in good shape for a long time. If you abuse the stone, it can wear out very quickly. A good common stone is the Norton India sharpening stone. It does a good job of sharpening skates. The standard sharpening size is 11″x 3″ . Diamond stones are also available and do an excellent job but they are much more expensive and some do not stay as flat as the heavy stones.Stones should be kept clean so that the steel shavings and grit do not clog up the pores and reduce the cutting effectiveness of the stone. Soaking a stone in oil (see oil below) upon purchase will tend to prevent grit from clogging the stone. If you follow the instructions below and keep the stone clean, you will find that it remains clean and effective. An old toothbrush will serve admirably to scrub the grit off the stone. Periodically, you may find it necessary to clean the stone thoroughly. This can be done by soaking the stone in kerosene and scrubbing thoroughly. If you look after a stone properly, this may not be necessary.
Between uses, the stone should be protected by keeping it wrapped in a lint-free clothe. If the cloth has some oil in it, this is good because it helps to keep the oil in the stone.
A stone is worn when valleys develop on its cutting edge. This will cause the stone to round off the skate blades and hampers the formation of a burr. Stones in this condition can be ground flat on a grindstone and re-used after a thorough cleaning. Valleys which can be detected visually are usually too large for effective sharpening.
-
Burr stones
Burr stones are smaller and are available in a number of materials. They are used to remove the burr built up during sharpening. It is worthwhile to invest in a good quality burr stone. They must be perfectly flat and have no lip (be careful of buying cheap burr stones in a hardware store. Burr stones are usually fine-grained and 3″x 1″. They can be bought through speed skating suppliers. -
Oil
You need oil to lubricate the sharpening stone. We generally use straight baby oil. DO NOT purchase baby oil containing scents or aloe vera. A light machine oil such as 3-in-1 will also do a good job. Do not use heavy mineral oil, motor oil, vegetable or any other food oil. Some clubs use WD-40. We do not allow our skaters to use this material. It is flammable and volatile. The volatile fumes in a closed area such as a dressing room are not good for lungs and therefore we do not want it being used. -
Rags, towel
You will need a lint-free rag to clean and wrap your stone. An old towel to put under your workspace to protect the floor is also a good idea.
-
Setting up the Skates
The following procedure takes you through putting your skates in the jig. If your skates are not properly placed in the jig, you will not be able to sharpen them properly and can even damage the blades. The most important thing is to be consistent in setting up the jig. If possible, always sharpen skates on the same jig so that the skate adapts to the idiosyncrasies of that jig. Even if you use a different Club jig each time, the most important thing is to set the skates up the same way each time. The objective is set up the skates so that both blades are parallel to one another and level on top.
Steps to follow in setting up the skates:
1. Before putting the skates in the jig, check that all bolts are tight and that the blades have not moved. Check for and remove any burr present on the blade before starting. Always set up the jig in the same way – keep the orientation of the front and back supports / legs the same from one time to the next. It is easiest to remember to put the honeycombed side of the front support facing towards you. Put the front support on the end of the support bar with the screw in it, orienting the support bar the same way each time. Put the back support on with the stop bar on the outside.
2. Tighten the front support to the holding bar first. Do not tighten the back support to the bar until you have adjusted for the length of the skate blade.
3. Place the skates in the jig the same way every time: it is easiest to remember to put the arches of the skates together (same way as they would go on your feet) and to put the front the skates to the front of the jig.
4. Set the skates in the jig and adjust the distance of the back support. Tighten the back support to the bar before tightening the blade brackets.
5. Tighten the blade brackets at the back first, making sure that the skates are flush against the plastic restraining bar. Then tighten the front brackets.
6. Check that the skates are level before proceeding. Check both by assessing the stability of the stone when it is placed exactly perpendicular to the blades, smooth side down. (i.e. does it rock), and by checking for equal scoring of the blades with the edge of the stone. This simple check is performed by tipping the stone up so that one corner edge is on the blades and run it sideways across the bottom of the blades. A thin etch mark completely across both blades indicates that the blades are level, hence, when grinding starts, the blades will be worn down equally. If the etched line only covers a portion of one blade, adjust the skates until a subsequent check shows a complete etch mark. If the skates are not level, undo the blade brackets, check the jig for tightness to the bar, check skates are flush to the plastic restraining bar and that there is nothing between the blades and the jig. Clean the blades to remove any residue, etc. Re-tighten and check again for level.
-
Grinding and Sharpening
The idea behind sharpening is to build up a very slight “lip” or “burr” on each side of the blade. Naturally the less burr that is built up, the less steel is being ground down and the longer the skates will last. Ideally, the same amount of burr should be developed on the entire length of the blade. This will ensure that the skate is being worn down evenly. To achieve this idea, it is best to develop a pattern of sharpening which covers the entire blade equally. The big stone can be held with one hand at either end, thus removing the fingers from any danger and providing even pressure on each side.
The face of the stone to be used should always have oil on it and the stone should be cleaned immediately after use. The stone should remain perpendicular to the blades at all times (even if the stone is being moved diagonally) so that the same part of each blade is being sharpened. Use the rough side of the stone first. The stone is run diagonally across the blades starting with the stone at the back, offset to one side, and going completely down and across the blades to the other end. The beginner is advised to make five strokes in one direction and then five in the other, sliding the stone across the blades so that the entire surface of the blade is covered. After two cycles of alternating direction, turn the jig around so that the stone is now traveling from the toes to the heels of the skates and repeat the same number of cycles. This will ensure that any pressure differential in one direction is canceled out, therefore permitting an even wear of the blades. It is also important to try and run the stone to the tips and the tails of the skate blades. If this is not done, the tips and the tail will gradually assume an out-of-proportion shape.
It is important to let the weight of the stone do the work and not to put unequal pressure on the stone. It is important not to change the rocker of the skate. The rocker should not be affected by sharpening in this manner. What will affect the rocker is repetitive grinding over a blade which has no burr. Never grind over one spot. Always maintain the same pattern of strokes and, in due course, the bare spot will develop a burr. Burrs can be detected easily by using the fingernails which will click on the tiny lip of steel. You must sharpen until a burr is present along the whole length of the blade.
When a complete burr is present, make a few passes with the smooth side of the stone in a forward and backward direction to remove obvious crosshatch marks. Again, even pressure is very important during this procedure. (Optional: Then, with the skates in the jig, take the burr stone and run it up and down the entire length of the blade on all four sides a few times to remove the bulk of the burr.)
Next, take the fine side of the big stone and polish the entire length of the blades. This is accomplished by running the stone backwards and forwards the length of the blades. Move the stone slightly each stroke so that grooves do not develop in the smooth side. You must polish the blades until no more marks are visible. This can be checked by removing all oil from the blades and sighting along them as light reflects along them. Once the skates are polished, remove all the burr. This can be done with the skates in the jig or the skates can be removed and it can be done by running the burr stone along the blades while holding the skates. This is a matter of personal preference.
If you are using a small burr stone, you can hold it one or two ways. If the skates have no significant bend in them, you can hold the burr stone parallel with the blades. However, if the blades are bent, it is better to hold the burr stone perpendicular to the blade. Some people just hold the stone against the skate with their bare hands. We suggest using an old piece of towel to help prevent cuts. You want the burr stone to lie flat against the blade or you will round off the edges and damage the blade, so be careful however not to tilt the stone.
Once the skate is de-burred, it should be sharp. Check completely along the length of the blades on both sides to ensure that they are equally sharp. Your fingernail should be readily shaved at all points. If this is not so, then you should repeat the sharpening.
A very important point to re-emphasize is that only a small burr is required for sharp skates. A large burr is harder to get rid of and directly contributes to a shorter blade life. A large burr will also sometimes just fold up rather than being properly removed, leaving your skates dull. If the skates are set up correctly in a consistent manner and a pattern is used for sharpening, the entire process should take no more than thirty minutes per pair and as you get better, the time will be reduced if you keep your skates in good condition.
Summary of important points to follow in grinding your skates:
1. Make sure the stone is clean before starting. Put oil on the rough side of the stone and spread it around before starting.
2. Do not press with any weight on the stone when using it. Let the weight of the stone do the work. Watch your fingers.
3. Start with the rough side of the stone. Always make complete strokes from front to back. Keep the stone square (perpendicular) to the skates and use the complete stone, making diagonal strokes with the rough side of the stone from one end of the skates to the other. Make five strokes in each direction then turn the jig and skates around: repeat five strokes in each direction. Continue until you have a small burr along the whole length of both sides of the blade. (Optional: Remove the bulk of the burr using the burr stone.)
4. Clean the rough side of the stone before proceeding.
5. Use the smooth side to polish the skates. When using the smooth side of the stone, go straight up and down, always keeping the stone perpendicular to the blades. Make sure that you move the stone every five strokes so that you don’t wear grooves in the stone. Make sure you go over the complete blade and turn the skates around every ten or fifteen strokes. Make sure you use the smooth side until no marks are visible on the surface of the blade. This is best checked by using reflected light off the bottom of the blade.
6. Remove the burr when you are finished. To make a very fine finish, you may first remove the burr while the skates are in the jig, give a final polishing with the smooth side, and then remove the skates from the jig for the final de-burring.
Ask your coach or an experienced skater if you have problems. Don’t forget to have your rocker and bend checked regularly. Some skaters will trace their rocker and bend traced onto a piece of paper or cardboard at the beginning of the year so they can then monitor for any changes.
Summary of important points to remember in sharpening your speed skates:
1. Always set up the jig in the same way: keep the orientation of the front and back supports the same from one time to the next.
2. Tighten the front support to the bar first. Do not tighten the back support to the bar until you have adjusted for the length of the skate blade.
3. Place the skates in the jig the same way every time – it is easiest to remember to put the arches of the skates together (same way as they would go on your feet) and to put the front the skates to the front of the jig.
Before putting the skates in the jig, check that all bolts are tight and that the blades have not moved. Check for and remove any burr present on the blade before starting.
4. Set the skates in the jig and adjust the distance of the back support. Tighten the back support to the bar before tightening the blade brackets.
5. Tighten the blade brackets closest to the stop bar first, making sure that the ends of the blades are both flush against the plastic stop. Then tighten the brackets at the other end.
6. Check that the skates are level before proceeding. Check both by assessing the stability of the stone (i.e. does it rock) and by checking for equal scoring of the blades with the edge of the stone. If the skates are not level, undo the blade brackets, check the jig for tightness to the bar, check that the blades are flush to the plastic restraining bar and that there is nothing between the blades and the jig. Re-tighten and check again for level.
7. Make sure the stone is clean before starting.
8. Do not press with any weight on the stone when using it. Let the weight of the stone do the work. Watch your fingers.
9. Start with the rough side of the stone. Always make complete strokes from front to back. Keep the stone square to the skates and use the complete stone, making diagonal strokes with the rough side of the stone from one end of the skates to the other. Make five strokes in each direction then turn the jig and skates around; repeat five strokes in each direction. Continue until you have a small burr along the whole length of both sides of the blade.
10. Clean the rough side of the stone before proceeding.
11. When using the smooth side of the stone, go straight up and down, always keeping the stone perpendicular to the blades. Make sure that you move the stone every five strokes so that you don’t wear grooves in the stone. Make sure you go over the complete blade and change the skates around every ten or fifteen strokes. Make sure you use the smooth side until no marks are visible on the surface of the blade: this is best checked by using reflected light off the bottom of the blade.
12. Remove the burr when you are finished. To make a very fine finish, you may first remove the burr while the skates are in the jig, give a final polishing with the smooth side, and then remove the skates from the jig for the final de-burring.